
Connecting & Verifying Your Squarespace Site With Google Search Console
Sign up for a free Squarespace trial here! #afflink

There are a lot of steps and actions you need to take in order to get your site to rank well on Google. Using Search Console is one of many.
Google Search Console is a tool you can use to get really valuable insights into your site’s performance, but I especially love using it to keep Google informed of the latest changes to my websites, so they can reindex accordingly without any delay.
But before you can submit a sitemap and inspect URLs, your site needs to be connected and verified.
In my experience, this process can sometimes be a bit tedious as there are a few if-then scenarios that could play out. So I wanted to create a guide that will help those of you with Squarespace sites connect and verify Search Console.
It isn’t the funnest thing to set up, but once you’ve connected and verified your site, it’s very simple to periodically resubmit your sitemap and request indexing for new material on your site (such as new blog posts or pages).
So let’s roll our sleeves up and do this one-time setup process.
Connecting Google Search Console To Your Squarespace
*** Note: Before trying to connect Search Console, you need to make sure your Squarespace subscription is activated, your domain connected, and your site public.***
attempt #1
First, let’s try this route, which is definitely the easiest and has worked for me recently on a site:
Sign up for Google Search Console if you haven’t already. You’ll need a gmail/gsuites email address.
Login to the backend of your Squarespace site. From the left dashboard menu, click Settings > Connected Accounts > Connect Account > Search Console > then follow the instructions.
Now head over to Search Console to add a property. A pop-up window will appear with two options: Domain or URL Prefix. Choose URL Prefix and paste your domain name in the box making sure to include the full URL (https:// and all).
Click continue, and it might just connect and verify your site right then and there. No further verification needed.
But it might not :/
If this doesn’t work, attempt the next option.
attempt #2:
Head over to Google Search Console again, and Add Property.
This time, instead of choosing URL Prefix, we’re going to choose Domain.
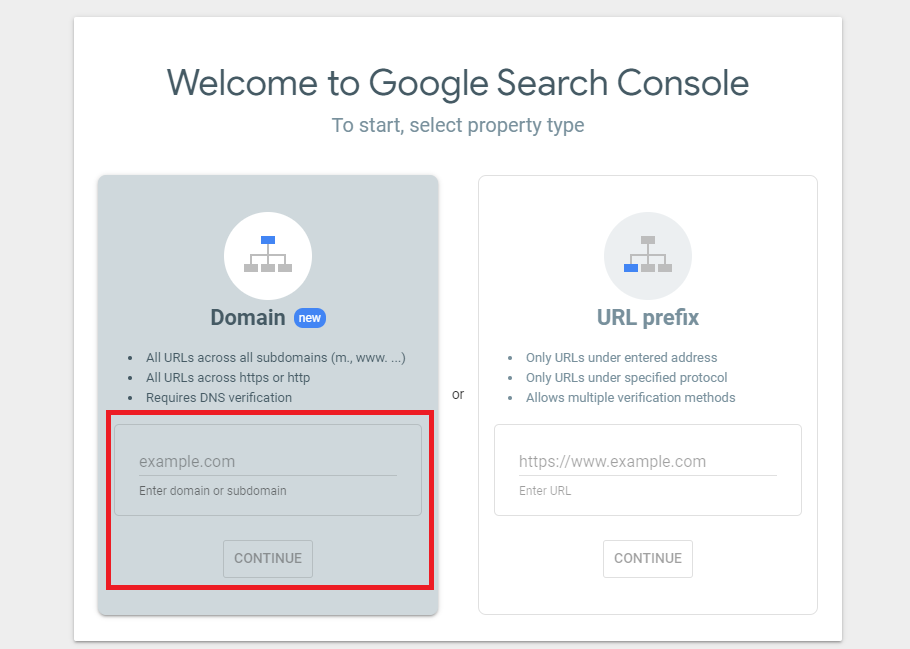
3. Enter your domain name simply in .com format, no https or www needed.
4. Click Continue and you’ll be given a verification code. Copy that entire code. Login to the backend of your Squarespace site, go to Settings > Advanced > Code Injection > paste that code into the Header.
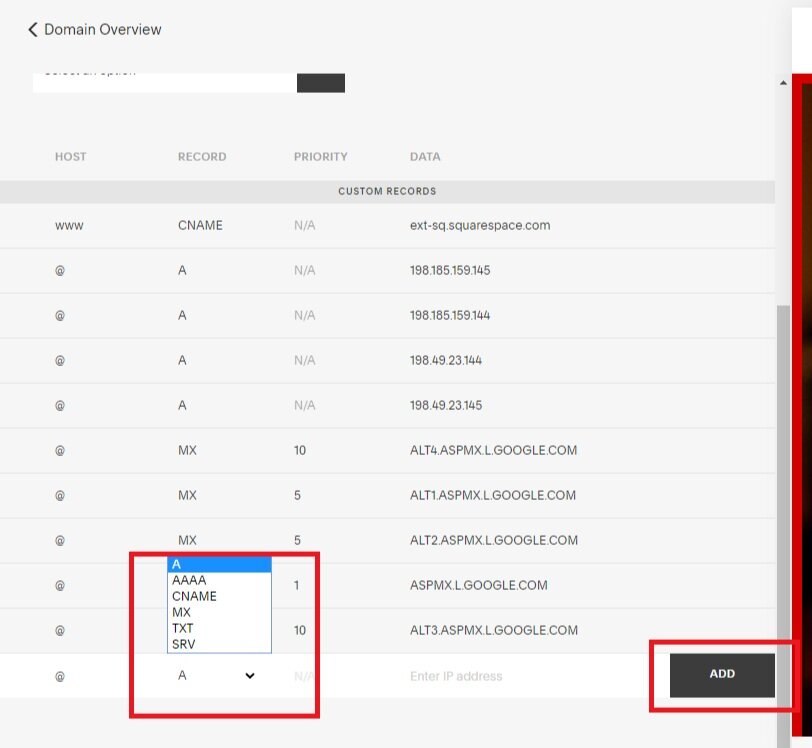
5. Then, go to Settings > Domains > click on your connected domain > Advanced Settings > now we’re going to add the code as a TXT record. At the bottom of the table of records, you’ll see an ADD button with a drop down menu in the same line. Click the drop down menu, choose TXT, then paste the verification code into the box, click Add. Save any changes.
6. Then head back over to Search Console and check for verification. You might have to wait a day or two for verification.
I don’t know why this process isn’t consistent between sites, but in my experience- it isn’t.
using Search Console for Squarespace SEO
submit your sitemap
Now that you’ve (hopefully) connected and verified your Squarespace site with Search Console, you’ll want to first submit a sitemap.
To do this, simply go to the main dashboard of Search Console, which should look like this by the way:
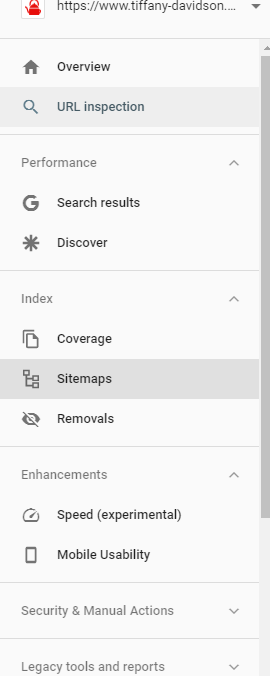
…and click Sitemaps. A box will be provided to you with your domain already placed, and you’ll simply need to type sitemap.xml into the box after the domain. Like so:

Click Submit. Ta-da! You’ve submitted your sitemap to Google. Good job. If you ever want to see your sitemap, just go to your URL, add /sitemap.xml at the end of the domain in the address bar, and hit Enter. A page full of black text should appear. This gives you an idea of the information Google bots get from your site which assists them in ranking, or not ranking, your site for specific keywords. A good SEO specialist will be able to implement SEO to target your preferred audiences which will reflect in the sitemap.
submit urls for inspection and indexing
Now you want to check all URLs around your site to make sure they’re showing up in Google. For example, if you have a 5-page website with a Home page, About page, Services page, Portfolio page, and Contact page, then you would want to submit each unique URL separately for inspection and indexing.
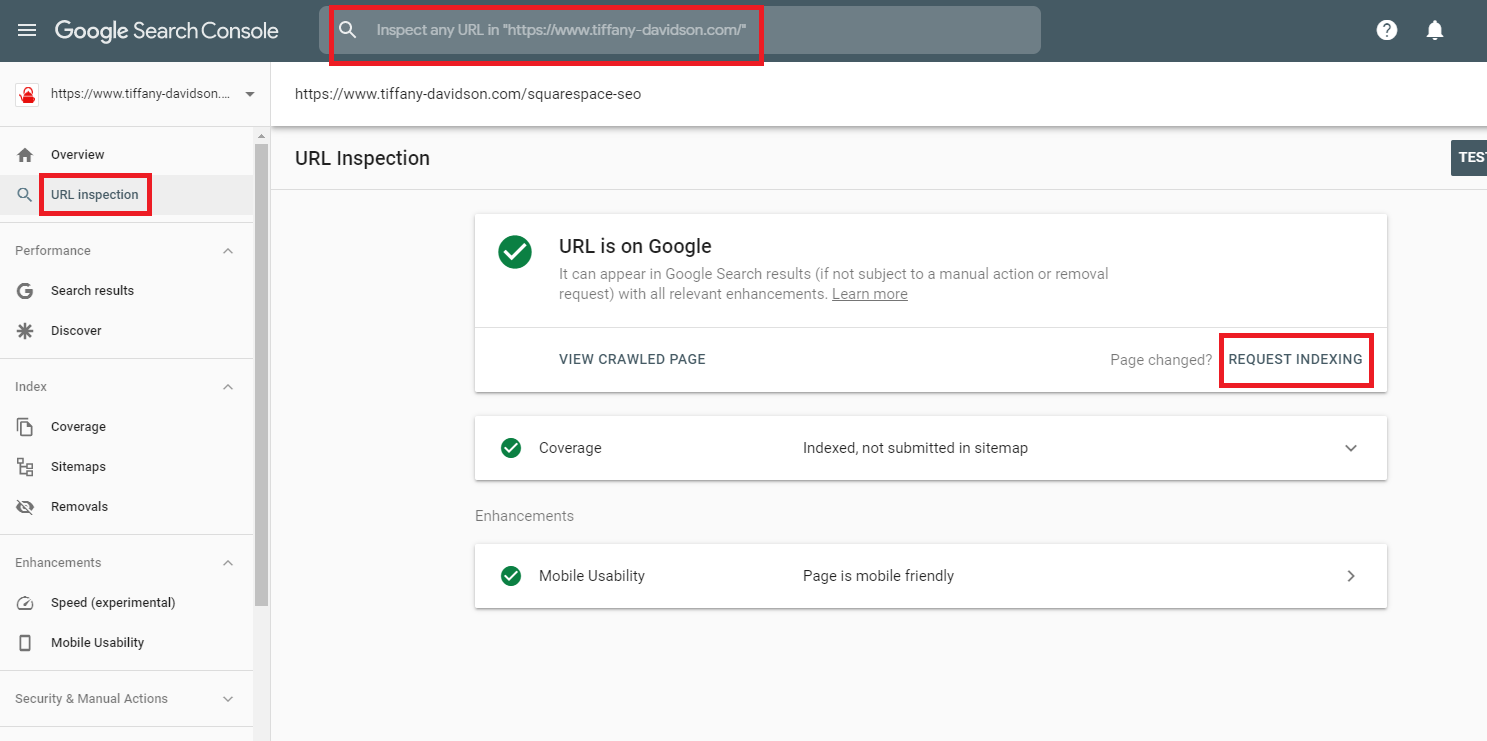
To do this, click URL Inspection in the left dashboard menu on Search Console. Enter the URL you want to get indexed in the top search bar, hit enter.
Then, Request Indexing.
Anytime you make changes to a page on your site, add a new page altogether, or publish a new blog post, be sure inspect the URL and request indexing in Google Search Console. This helps Google catch on to your changes and index them more quickly, in my experience.
As always, let me know if you have any questions and I’ll do my best to respond.
I hope this was helpful! Talk to you again soon!
x
Tiffany


welcome!

Hey there! I’m Tiffany ~ a Squarespace Web Designer & SEO Expert. I design beautiful & professional websites that rank well on Google, & I teach courses on becoming a Squarespace SEO Expert, Monetizing Squarespace, and Starting Your Own Squarespace Design Business!
Feel free to contact me at: tiffany@tiffany-davidson.com
Sign up for a free Squarespace trial here! #afflink
My Courses:

Learn how to get your Squarespace website (or any Squarespace website) to Google Page 1 using organic SEO techniques!
As a Squarespace Designer & SEO Expert, I know the methodology for truly getting Squarespace websites to rank on Google Page 1, and I’m going to teach it to you!
This course is a self-guided lifetime-access course, so you can go at your own preferred pace and keep it as a resource to return to time and time again.
Please note: This course was created using Squarespace version 7.0. The same principles will still apply with version 7.1, but the overall user interface will look slightly different. Due to the inherent nature of digital products, refunds are strictly prohibited once purchase has been made. Please also note the course cost is $267 in USD currency.

Can you monetize a Squarespace website? Yes, you can. And I’ll teach you how.
Did you know your Squarespace website could be making money for you, even while you sleep, work your day job, or travel?
In this course, which includes over 3 hours of video instruction, I’ll teach you how to use SEO blogging to drive traffic to your site, and then how to monetize those visits.
Please note: This course was created using Squarespace version 7.0. The same principles will still apply with version 7.1, but the overall user interface will look slightly different. Due to the inherent nature of digital products, refunds are strictly prohibited once purchase has been made. Please also note the course cost is in USD currency.

Learn how to turn your basic design knowledge into a functional and successful business!
In this course, I outline the procedures I use to run my Squarespace design business which continues to grow in revenue every single year and has given me wonderful freedom to not only work from home, but to be able to craft my own schedule. Becoming a Squarespace designer changed my life, and I think during these new times we find ourselves in, where so many businesses are having to transition to the online marketplace in order to stay afloat, becoming a self-employed web designer is a really smart move.
Please note:
This is not a design course. Rather, this course assumes you already possess at least a basic understanding of Squarespace design and need guidance on converting that knowledge into a business.
Due to the inherent nature of digital products, refunds are strictly prohibited once purchase has been made.
The course cost is in USD currency