Squarespace SEO: How To Optimize Blog Posts Before Publishing [A Checklist For SEO Blogging Success]
Sign up for a free Squarespace trial here! #afflink
I’ve written before about my track record of getting Squarespace websites to rank on Google Page 1. I’ve also published numerous posts about the importance of blogging.
This article will link the two by showing you exactly how you should optimize a blog post before publishing it to your Squarespace site.
A lot goes into optimizing a blog post.
Blogging for SEO seems to be the hardest thing for my clients to wrap their head around.
My clients are professionals and makers, creatives, entrepreneurs; they’re too busy to become SEO specialists, too.
I want my clients to succeed, so I decided to write a comprehensive blog post full of graphics and a detailed checklist of alllll the things you need to do to create SEO-optimized blogs using the Squarespace platform. If you really want to dig in deep, I recommend checking out my Squarespace SEO Expert Course, though. It is full of ALL my secrets.
A good SEO-driven blog post takes hours, even days, to create. But, if done right, the payoffs can continue for years to come.
Let’s get started!
How To Optimize blog posts For SEO on your Squarespace Site
A checklist for optimizing blog posts before publishing
Step 1: Keyword research
A common statement from my clients when I advise them to begin a blog if they want to grow their SEO footprint is: “I have no idea what I’ll write about…” To which I respond: “You don’t have to know! Keyword research will tell you what you should write about.”
This post isn’t to teach you keyword research, but keyword research is THE foundation of good SEO, so if you don’t truly understand how to keyword research, then you should invest in my Squarespace SEO Expert course (which will also teach you how to blog for SEO, in detail).
But, you will NEED a specific keyword you’re focusing on for each blog post you ever create. This needs to be explicit, well-researched, and understood before going any further (I can’t stress this enough).
STEP 2: outline your post using header text
Once you’ve done your keyword research, it’s time to start writing the actual post.
I recommend using the keywords themselves to outline your post before you start writing it to help structure the post and optimize it for SEO.
Google places more importance on Heading 1 and Heading 2 text, so using your keywords as Header 1 and 2 text is ideal.
Again, using this post as an example, note how I’m using Header * 3 * text to list the actual Steps because they aren’t keywords and header 3 text is less important to Google bots. But, throughout the post, notice how I’ve wordsmithed my keywords into Header 2 text to act as titles of sections.
You can find related keywords and questions by entering your keyword into Google and looking under the People Also Ask section, then scrolling to the bottom to see related keywords. For example, if I enter the keyword "sugar free breakfast cereal” into Google, here are some questions and keywords I might want to use to help structure and outline my post:
Step 3: Write the actual post
It’s up to you to create the content for your post. But I can give you some really important guidelines to keep in mind.
Use a lot of white space. In this post, you’ll see I rarely have paragraphs over three lines of text before incorporating white space. Like it or not, our online psychology likes to keep moving, taking in as much information as possible. Using generous amounts of white space allows your visitor to scroll often, which helps keep them engaged. Do not use walls of text. Ever. Unless you want your users to click away from your site.
Use a variety of media. Be sure to include with your text and white space plenty of visual fodder - from simple lines to divide content, to graphs and charts, photos, videos, bolding certain text, using bullet lists, different headers, quote blocks… these are all ways to keep the human brain interested. Just make sure everything is on-topic with your post. (We’ll talk about how to SEO optimize these files next).
step 4: Optimize files within your post
When you upload an Image to your post, always do these three things:
Resize and compress all images before uploading to Squarespace, making sure the file size is always 500KB or less. The longest side should be no more than 2000px (unless you’re using it as a full-bleed banner image, which you’re probably not when crafting a blog post) This applies to your blog post thumbnail as well.
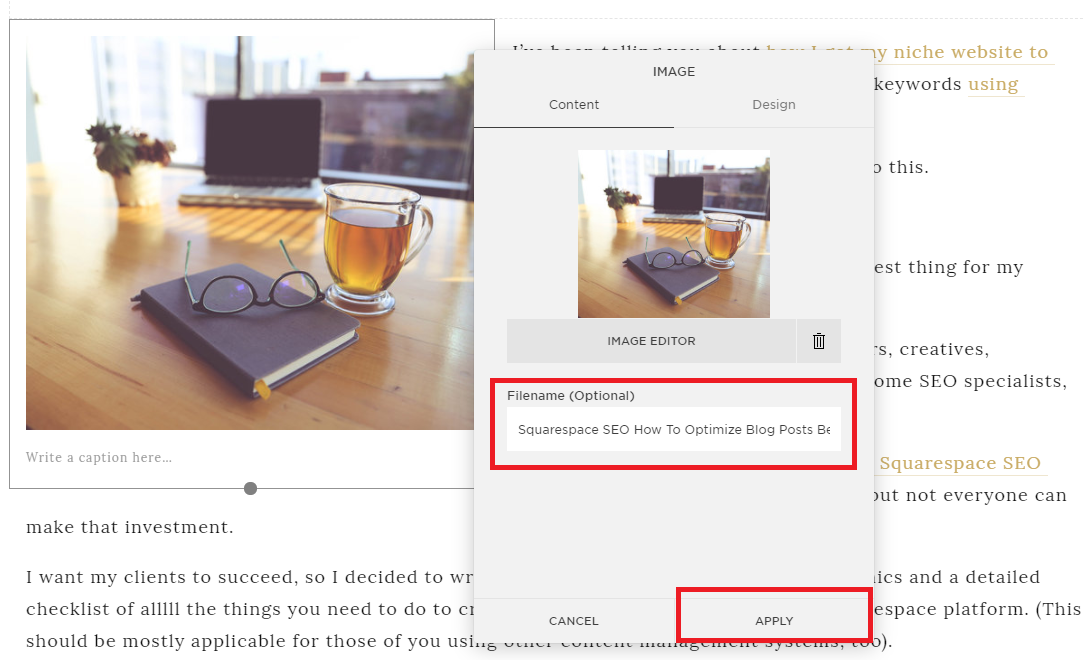
Edit the filename of the image.
To do this, just hover over the image, click Edit, delete the current filename and replace it with the [optimized] blog post title or your target keyword. For example, in this post, I’m going to edit the filename of all Images with the title of this blog post, then click Apply.
3. Edit the caption of each file.
Next, I put the [SEO optimized] title of the blog post, or the target keyword alone, in the caption:
That’s not all, though. You don’t want your caption to show, so the next step is to click Edit at the top of the image, choose the Design tab, from the drop-down menu select Do Not Display Caption, then click Apply.
Now those SEO keywords are stored on your sitemap for Google bots to crawl, but your visitors won’t see them.
step 5: Add Tags To The Blog Post
This step is very simple.
Add your target keyword and any related keywords, according to Google, to the TAGS of the blog post.
step 6: Optimize the blog post title, URL, & Thumbnail
In my experience, the title and URL of a blog post are really important for ranking. So I make sure to optimize the heck out of them.
To optimize your title, just make sure to be succinct and use at least one keyword phrase. If you can incorporate more keywords without it sounding cheesy, do so.
The title of this post is “Squarespace SEO: How To Optimize Blog Posts Before Publishing [A Checklist For SEO Blogging Success]” which touches on four different related keywords yet it still flows and makes sense. If your target keyword was “sugar free breakfast cereal” then you might title your post something like “My Favorite Sugar-Free Breakfast Cereal Recipe” … just be sure your keyword is contained within the title.
When it comes to optimizing your URL, you don’t have to be so concerned with the flow of it. URLs are more for machines and programs to read, not humans.
Two main points for optimizing the URL: keep it short and keyword-focused. I recommend removing the date just so there’s no unnecessary text, and be sure to separate each word with a hyphen.
And make sure to resize and rename your thumbnail image before uploading it! The filename for your thumbnail image should either be your blog post title or simply the keyword. After you’ve resized and renamed the image, upload to your blog post.
Step 7: Publish the Post!
Woohoo. Sometimes this part seems like it’ll never come.
Check your post over, be sure everything flows and looks good, add a sidebar if you want (I’ll have to write a whole other post about that), and once all of your T’s are crossed and your I’s dotted, publish the dang post!
Of course, now it’s time to promote and all that (see Step #3 in this other post), but give yourself a pat on the back, stand up, stretch, get something to drink, and feel good about the SEO snowball you just contributed to.
Please leave a comment below or contact me if you need any help with Squarespace SEO or Design! And if you really want to learn Squarespace SEO expertise to get your site(s) to Google Page 1 or to add value to your Squarespace Design business (I doubled my annual salary after adding SEO to my Web Design package), definitely take a look at my Squarespace SEO Expert Course.
Let me know if you have any questions in the comments section below; I’m happy to help!
Thanks for stopping by and I’ll talk to you again soon. Take care~
x
Tiffany
Welcome!
Hey there! I’m Tiffany ~ a Squarespace Web Designer & SEO Expert. I design beautiful & professional websites that rank well on Google, & I teach courses on becoming a Squarespace SEO Expert, Monetizing Squarespace, and Starting Your Own Squarespace Design Business!
Feel free to contact me at: tiffany@tiffany-davidson.com
Sign up for a free Squarespace trial here! #afflink

![Squarespace SEO: How To Optimize Blog Posts Before Publishing [A Checklist For SEO Blogging Success]](https://images.squarespace-cdn.com/content/v1/5a7a523b90bccea7812ba94e/1539977542507-PNSIYT3W5TSAX45AIMOU/Squarespace+SEO+How+To+Optimize+Blog+Posts+Before+Publishing+Blogging+For+SEO+Success)












![Squarespace SEO: How To Optimize Blog Posts Before Publishing [A Checklist For SEO Blogging Success]](https://images.squarespace-cdn.com/content/v1/5a7a523b90bccea7812ba94e/1542062837955-PJZYLUTQWMUL9NXSCPIM/Squarespace+SEO+How+To+Optimize+Blog+Posts+Before+Publishing+A+Checklist+For+SEO+Blogging+Success.png)


